SimpleRTApp: MySQL setup and Node.js access through a REST API
This is the fourth part of a series of articles with the objective of building a system to notify relevant tweets and retweet them, in an iOS app.
In this article we’re going to see how to configure the MySQL database and how to run queries from Node.
What are we going to see?
- Installation and configuration of MySQL
- Tables and attributes creation
- Basic Node.js script to connect to DB
- Needed queries for SimpleRTApp
Requirements
In order to follow this article, it’s necesary a basic concept about relational databases, SQL queries and having Node.js installed in the system.
Why MySQL?
MySQL , is a relational database management system or DBMS. This database manager is multithread and multiuser, which allows it to be used by several people at the same time, and even, make several queries at once, which makes it extremely versatile.
It started as a Free Software initiative and is still being offered as such, for private users. But if you want to use it to manage data in a company, you can buy a license, such as proprietary software, that is authored by the sponsoring company (Oracle).
I’m going to list some advantages about MySQL as DB manager:
- It’s easy to use
- The support is accessible as long as it is needed
- It’s open source
- It’s incredibly cheap
- It’s an industry standard (and it’s still pretty popular)
On the other hand, it also has its disadvantages:
- It has some stability disadvantages
- Suffers from low scalability performance
- Its development is not led by the community
- Its functionality is quite dependent on add-ons
- Developers can find some of their limitations a bit frustrating.
Another options in the market
While I chose MySQL for this project, there is nothing that prevents us from using other options available in the market. The most important ones are:
- MariaDB
- PostgreSQL
- SQLServer
- MongoDB
I recommend to investigate and read about other database systems and its features, so we would have more info about what we can use on our projects.
Installation and configuration of local MySQL
- We download the
.dmgpackage in this link. We follow the installation steps, selecting all the default components. More info about how to install MySQL here.
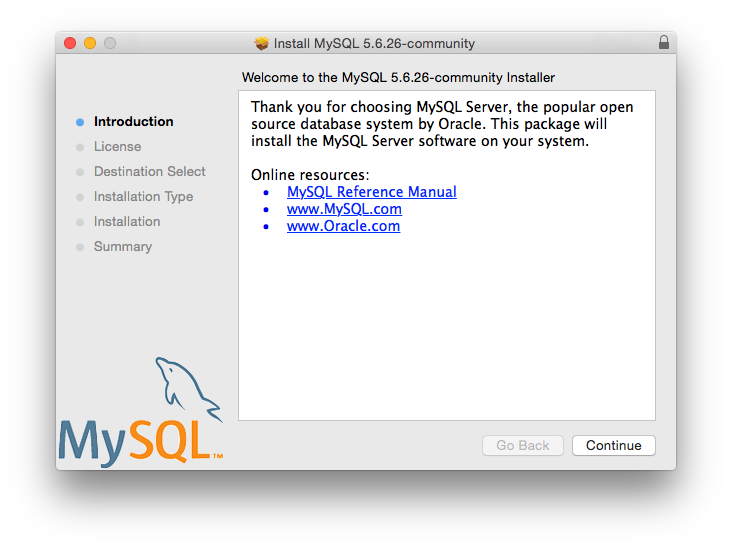
2. At the end of the installation, we will be provided with credentials for the root account. Something to keep in mind is that MySQL expires this password quickly for security reasons, so we will have to change it as soon as it is given to us. More information at this link.
3. We install the SequelPro application (just for MacOS), downloading the package in this link. This application will allow us to interact and configure our database. In it we enter our root credentials to start operating.
4. We create a new database selecting Database -> Add database... We put a
name like simplertapp and tap on Add.
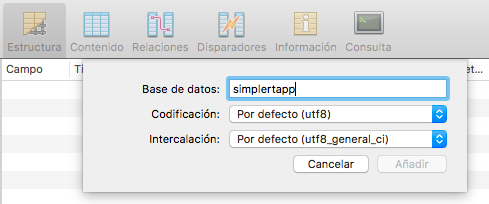
We create a new database
5. We create a new table tapping on + button at bottom left. We put a name
liketweet_request and tap on Add.
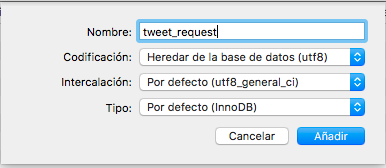
We create a new table
6. We create the table fields tapping on the + button in the fields view,
which is located over INDEXS. By default it will be created with INT type.
We put id as name, as it will be the identifier of the tweet_request data.
Following the previous steps, we create the following tables with its respective fields:

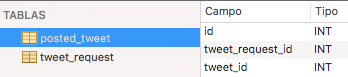
It’s important to set the VARCHAR type and the device_token longitude, and
hashtags to a higher value to use these fields.
Having created the tables, we already have the database properly configured to be able to use it.
Node.js usage to query, update and delete data
- We install the MySQL package doing
npm install mysql --savethrough the terminal - We create a script called
mysql_example.jswith the following content:
At first, we load the library for the enviroment variables and we instantiate the required to work with MySQL.
Then, we create the database connection, setting the needed values:
host: It’s the address where our database is located. By the moment it will have the value of127.0.0.1user: It’s our user name. In this case it would beroot.password: It’s the password that we set previously to use SequelPro.database: It’s the database name. In our case it will besimplertapp.
To set these values, I’ve created a .env file to store those in a more
secure way. More info here
Finally, we do the following SQL query to the database:
INSERT INTO tweet_request (device_token, hashtags) VALUES ('ExampleDeviceToken', '#Example #Hashtags')
It will insert the values ExampleDeviceToken and "#Example #Hashtags" as
values of a first entry. The id field is not mandatory because it’s
autoincremental.
If everything went right, the script will end, otherwise it will show in console the found error.
3. We run the script with node mysql_example.js in terminal.

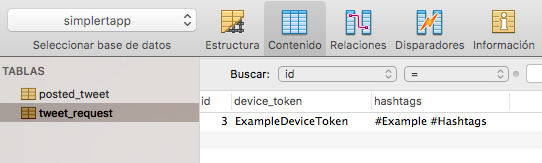
To verify that the field was correctly inserted, we go to SequelPro, select
the tweet_request table and in the Content tab we look the inserted entry:
With all of that we created our first script in Node.js that allow us to insert entries in a MySQL database.
You can find the script code in
https://github.com/fedejordan/SimpleRTAppAPI,
with the tag mysql_example. It’s important that you correctyle setup the
.env file the needed propertes to connect to the database.
MySQL usage in SimpleRTApp API
As we saw in the API REST creation post, we were querying and modifying data in memory. The idea is being able to save all this information in a database, so we can properly query and modify thought our Node.js API.
Looking at the availables endpoints in our API, we’re going to need then the following features:
- Get
tweet_requestentries by itsid. - Delete
tweet_requestby itsid. - Insert
tweet_requestentries specifying itsdevice_tokenand itshashtags. - Insert
posted_tweetentries specifying itstweet_request_idand itstweet_id.
To do that we’re going to create a DB connection file called
databaseHelper.js where we’ll do the main connection with the database and
the specified query thought a sqlQuery parameter.
Note: For simplicity purposes, a connection to the database will be created for each request received. This is NOT PERFORMANT , since it should be handled through a pool of connections, but the topic will not be covered in this article. More information about connection pool here.
We continue with the creation of a tweetRequestDatabase.js file in the
api/database folder with the following content:
In that file we obtain the reference to databaseHelper, and with the
parameters in insertTweetRequest function we create the SQL query and we run
it.
Finally, we change our tweetRequestController.js with the following:
As we change what we had before, we obtain the reference to
tweetRequestDatabase and we insert the object tweetRequest built in the
database with tweetRequestDatabase.insertTweetRequest(tweetRequest).
We run our server in terminal with node server.js and we open Posting to do
a POST /tweetRequest:
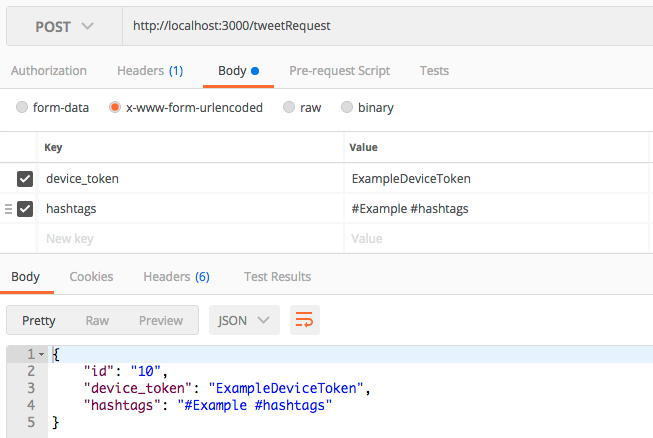
Because we keep maintaining the memory array, we’re still getting the id 10.
We go to SequelPro to see if our entry was inserted:

Depending in how many values we have inserted previously, the id field can
be different. In my case I deleted the previous one that we had inserted with
the mysql_example.js script and I reset the autoincremental id. To do it
we can run the following SQL query in SequelPro, in the Query tab:
ALTER TABLE tweet_request AUTO_INCREMENT = 1
With that, our API is capable of insert values in the database ;)
Complete example
With the previous content, we can finish the other API endpoints. It should be something similar to the following:
In tweetRequestDatabase.js we add the functions to do the corresponding
SELECT andDELETE, with a determined tweetRequestId. We add the
callback to know when the write or read operation finished.
In tweetRequestController.js we delete all the logic related with the memory
array, and we use the callback that tweetRequestDatabase gives us to send
a response with 200 status, ending it.
We add the properly postedTweetDatabase.js to send the INSERT with the
postedTweet data to the database.
Finally, we also update postedTweetController.js so we can use
postedTweetDatabase and if everything went right send the 200 status code.
With all of that we finished all the requirements for our API, so we can query, delete or insert entries in a MySQL database :)
Some considerations
Because the simplicity that I wanted to explaint the subject, we didn’t handle some topics:
- It’s not performant to create a connection for each request. This is completly unescalable and it requires to create a request pool. I’m going to explain this in a new article later. More info about that.
- There is no handling of error statuses, for any fail that we have (for example, if we want to delete a
tweetRequestwith a invalidtweetRequestId)the API doesn’t send an error status. This is very important if we want to communicate to the client that the server failed to acomplish the task. See error handling.
Conclusions
We installed MySQL. We saw how to configure a database in a local environment. We learnt it in a simple way, just using SequelPro, which we used to create tables and fields of different types.
Later, we saw how to interact with a MySQL database with Node.js. We saw how to do query operations, insertions, and entries deletion.
Finally, we integrated all these operations to the REST API that we created in the previous article.
While not all programmers use Node.js and MySQL in our day-to-day work, I believe that minimally following these steps will give us a basic understanding of how a REST API is built, and we can have a better understanding of the entire system.
In the next article we will configure our iOS app to consume all these APIs.
Thanks for reading the article!
Sources
- http://culturacion.com/que-es-y-para-que-sirve-mysql/
- https://www.datarealm.com/blog/five-advantages-disadvantages-of-mysql/
- https://blog.capterra.com/3-standout-mysql-alternatives/
- https://www.slant.co/options/4216/alternatives/~mysql-alternatives
- https://dev.mysql.com/doc/refman/5.7/en/osx-installation-pkg.html
- https://dev.mysql.com/doc/mysql-getting-started/en/#mysql-getting-started-installing
- https://www.w3schools.com/nodejs/nodejs_mysql_insert.asp
- https://www.npmjs.com/package/node-env-file
Este artículo tambien esta disponible para ver en Medium