SimpleRTApp: Basic structure of a Node.js API REST
This is the third part of a series of articles with the objective of developing a very simple system, in which notifications are sent to the user about tweets with relevant hashtags every certain time defined. Here is the complete list.
In this opportunity, we’re going to see how to structure a pretty simple API in Node.js, which dependencies we need for our project, and which resources we must provide to the mobile app to work with a MySQL database.
From my side, I’ll try to be as simple as possible, because writing this article also will be a learning process for me :)
Concepts
We’ll see the following:
- What is a REST API and how it works
- Basic server setup in local environment
- Service routing
- Controller layer
What is a REST API?
REST is an acronym for Representational State Transfer. It is a web standard for architecture and HTTP protocol. The REST architecture describes six constraints that were originally communicated by Roy Fielding in his doctoral thesis and defines the basis of the RESTful style with the following:
- Uniform interface
- Stateless
- Cacheable
- Client-server communication
- Layer system
- On demand code (optional)
The RESTful applications use HTTP requests to do CRUD operations (C: create, R:read, U:update, D:delete). Create and/or Update are used to post data, Read to read o list data and Delete to delete.
Basic setup of a local server in Node.js
- We create a folder where we’ll have the API. In our case it will be
SimpleRTAppAPI. To do that, we writemkdir SimpleRTAppAPIin the Terminal app. We go the the folder withcd SimpleRTAppAPI. - We create a file
package.jsonwith the commandnpm init. It’ll allow us to identify the project and also see the depedencies that it needs. We indicate values like package name(simplertappapi), author, description, version, input file (will beindex.jsonin our case) and other fields.
SimpleRTAppAPI federicojordan$ npm init
This utility will walk you through creating a package.json file.
It only covers the most common items, and tries to guess sensible defaults.


See `npm help json` for definitive documentation on these fields
and exactly what they do.


Use `npm install <pkg>` afterwards to install a package and
save it as a dependency in the package.json file.


Press ^C at any time to quit.
package name: (simplertappapi)
version: (1.0.0)
keywords:
author:
license: (ISC)
About to write to /Users/federicojordan/Blog/SimpleRTAppAPI/package.json:


{
 "name": "simplertappapi",
 "version": "1.0.0",
 "description": "Simple API to trigger relevant tweets in push notifications",
 "main": "index.js",
 "dependencies": {
 "dotenv": "⁵.0.0",
 "twitter": "¹.7.1"
 },
 "devDependencies": {},
 "scripts": {
 "test": "echo \"Error: no test specified\" && exit 1"
 },
 "repository": {
 "type": "git",
 "url": "git+https://github.com/fedejordan/SimpleRTAppAPI.git"
 },
 "author": "",
 "license": "ISC",
 "bugs": {
 "url": "https://github.com/fedejordan/SimpleRTAppAPI/issues"
 },
 "homepage": "https://github.com/fedejordan/SimpleRTAppAPI#readme"
}


Is this ok? (yes)
We check that the values are correct and press enter to confirm the file creation.
3. Install the package express with the npm install express --save
command. This dependency will allow us to create the server and listen HTTP
requests.
4. Create the file server.js with the following content:
5. We execute node server.js in the terminal app and we should see our
first server listening to 3000 port. We can change the listening port also
using an environment variable PORT in our configuration file .env.
SimpleRTAppAPI federicojordan$ node server.js
SimpleRTAppAPI server started on: 3000
SimpleRTApp API creation
We are going to start to write the needed endpoints for SimpleRTApp. Because we didn’t set the database, we are going to use memory data with learning purpose. This means that if our server reset, we will loose all the modified data since it started.
Endpoints to create:
- Hashtags query for a device_token: It’s necessary to have the possibility of knowing which hashtag belongs to a certain device_token, in case the user opens the app again.
- Saving of a device_token related to a certains hashtags: When the user decides about which hashtags he wants to be informed, we’ll call this resource to save in the database the hashtags for his device_token
- Deletion of a device_token: In case the user wants to desubscribe to the notifications, we simply have to call this endpoint to remove his device_token from the database.
- Saving of a posted tweet id: It’s also important to save the tweets that have been posted from the app, in a way that the next time that we notify we don’t repeat a previously posted tweet.
Routing layer
The routing layer refers to how an application responds to a client request for a certain endpoint, I mean, for a specific rout and for a determined HTTP method (GET, POST, DELETE, etc)
In our case we’re going to have 4 routings, each one related with the number of endpoints described before.
Controller layer
It’s responsibility belongs to do all the needed logic to acomplish the requested resource. The controller layer has the access to the models, and can add, modify, delete, query as explicitly. We access it with a defined route in routing layer.
Our controllers will have the logic to save device_token with hashtags, delete device_token, save the posted tweet id and query hashtags for a certain device_token.
We are going to start with the most simple endpoint, query hashtags for a certain device_token.
First endpoint: Hashtags query
- We create a file
tweetRequestRouters.jsin the folderapi/routeswith the following content:
This means that for the route /tweetRequest we’re going to wait a GET
request with a tweetRequestId parameter. From its side,
tweetRequestController will have the logic to retrieve the wanted data in
its function getTweetRequest.
2. Create a file tweetRequestController.js in the folder
api/controllerswith the following content:
In this case we export the getTweetRequest function so it can be used by
tweetRequestRouter.js. We look for the object tweetRequest in the array
that we create below and we retrieve it in JSON format.
3. Update our file server.js so it can manage the needed route and it
retrieves a HTTP response.:
In that way we configure the server so it can accept URL encoded and it manage
JSON type responses. Also, we delegate the routing to tweetRequestRoutes.
4. We do node server.js in the root folder of the project, we open Postman
app and try doing a GET to<http://localhost:3000/tweetRequest/1>
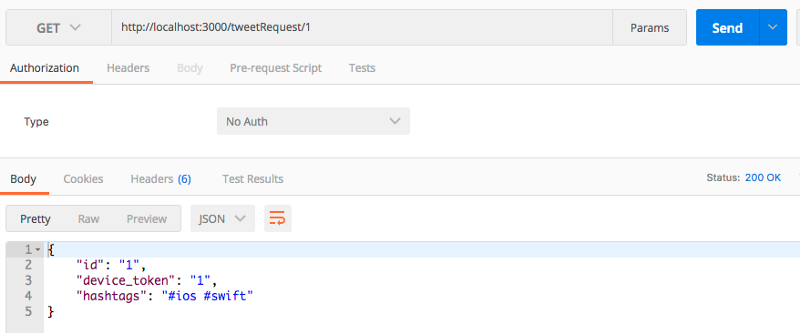
If we try with another tweetRequestId it should give us its fields, if we
defined it in the array.
If we try with another id, or we change the HTTP method (by a POST, for instance), or we change the route it should give us error. Later we should define answer HTTP error codes so the client can manage the error correctly.
Final code
Once we understand how the process works, we can start doing the other endpoints.
Our final code should be similar to the following:
In server.js we added other routing file for PostedTweet entity, it will
indicate us if a tweet has been posted by an user.
We add the possibility to create TweetRequest with the POST method and
creating a function createTweetRequest in tweetRequestController.js. Also,
we did the endpoint of deleting TweetRequest with the DELETE method, which
the routing redirect to the function deleteTweetRequest.
In tweetRequestController.jswe add the following functions:
createTweetRequest: We obtain the maximum value ofidin thetweetRequestsarray, it creates the JSON object with that value but incremented by one, the values ofreq.body.device_tokenandreq.body.hashtagsand it’s added to the array in memory.deleteTweetRequest: we delete theTweetRequestwith thefilterfunction and we obtain the total array as an answer.
We also added two files: postedTweetRoutes.js and
postedTweetController.js:
We create a POST method which will be associated to the createdPostedTweet
function from postedTweetController.This will allow us to indicate which
tweet has been posted by the user.
In the case of the controller the function createPostedTweet create the
PostedTweet from the last id that it finds in the postedTweets array (it
there is nothing it uses 1 as first id) and it uses the values
req.body.tweet_request_id and req.body.tweet_id to create JSON type
objects and insert it in the array. As an answer it retrieves all the array to
ensure that it has been inserted.
I recommend test the different endpoints with Postman to ensure that everything works as expected.
You can find the complete source code in
https://github.com/fedejordan/SimpleRTAppAPI,
tag rest_api.
Conclusions
We learned what is a REST API and how it can help us in our project, how a correct definition of the web services is the fundamental piece to understand our system architecture.
We created a basic server to see which are the minimum installation steps and which dependencies it needs.
We had to see which entities we use, which resources and how we separate the logic in the routing and controllers layers.
I hope that you enjoyed the article. For sure it won’t be the most performant, buy I think that it’s a first step to understand how a minimum API structure works.
In the following article we are going to see how to really interact with a MySQL database and do the necessary setup in a local environment.
Any question, suggestion or idea you can send post a comment or send me a mail to fedejordan99@gmail.com
Thank you very much!
Useful links
- https://www.codementor.io/olatundegaruba/nodejs-restful-apis-in-10-minutes-q0sgsfhbd
- http://thejackalofjavascript.com/architecting-a-restful-node-js-app/
- http://expressjs.com/en/api.html
- https://www.w3schools.com/jsref/jsref_tostring_number.asp
This article is also available on Medium