SimpleRTApp: Twitter Search API with Node.js
This is the second part of a series of articles that I wrote with the aim of having a system that notifies tweets of my interest, and through an app I can retweet them to my liking. To see the complete list click here.
This time we will see how to get tweets through the Twitter API in Node.js. To do this, we will see how to perform authentication for an app and see how the Twitter Search API works to obtain this information.
Requirements
It’s needed to have a configured app in Twitter. In the first part of this
article I explain it with details. Also,
we need to have npm locally configured.
Application-only Authentication
Twitter offers us to authenticate their API queries with the app authentication mode. This means that we can only do things that don’t require an user authorization. Some actions that we would have availables are the followings:
- Get tweets from public users
- Access to friends and followings of any account
- Search in tweets
- Obtain any information about some user
On the other hand, some things that we will not be able to do are the following:
- Post tweets or any other resource
- Connect to streaming points
- Search by users
- Use any geolocalization point
- Access to direct messages or users credentials
Auth Flow steps
The Application-only authentication flow includes the following steps:
- An app encodes its Consumer Key and its Consumer Secret into a special set of credentials
- The application makes a request to
POST Oauth2/tokenendpoint to change credentials for a Bearer-type token. - When we want to access to the REST API, the application uses the Bearer token to authenticate.
More info about these concepts can be found in the Twitter official documentation.
Example of obtaining a Bearer Token
We are going to see an example of a Bearer token generation and a query of the Twitter API with that token. For that we’ll encode the Consumer Key and the Comsumer Secret , obtain the Bearer from Twitter, and we check that we made everything well making a timeline request.
Step 1: Encode Consumer Key and Consumer Secret
- Make an URL Encode to the Consumer Key and the Consumer Secret with RFC 1738 standard. Let’s suppose that we have the following keys:
ConsumerKey: xvz1evFS4wEEPTGEFPHBog


ConsumerSecret L8qq9PZyRg6ieKGEKhZolGC0vJWLw8iEJ88DRdyOg
We do the URL Encode in RFC 1738 (for instance, in this page) and we obtain:
ConsumerKey: xvz1evFS4wEEPTGEFPHBog


ConsumerSecret L8qq9PZyRg6ieKGEKhZolGC0vJWLw8iEJ88DRdyOg
Something to say is that actually these keys are going to maintain their value after encoding them. But it is important to do this step in case their value change in future.
2. Concatenate the encoded values with the two points character (:) in an
unique text string. Our values will be as follows:
xvz1evFS4wEEPTGEFPHBog:L8qq9PZyRg6ieKGEKhZolGC0vJWLw8iEJ88DRdyOg
3. Encode the generated string with the Base64 standard. It can be done in a page like this one. We will obtain this result:
:: eHZ6MWV2RlM0d0VFUFRHRUZQSEJvZzpMOHFxOVBaeVJnNmllS0dFS2hab2xHQzB2SldMdzhpRUo4OERSZHlPZw==
This value will be used in the credentials for the Bearer token generation endpoint.
Step 3: Obtain a Bearer token
The obtained value can be changed by a Bearer token making a request to
POST Oauth2/token. To do that:
- The request must be HTTP of type POST
- It should include a header
Authorizationwith the value ofBasic <step 2 value> - It should include a header
Content-Typewith the valueapplication/x-www-form-urlencoded;charset=UTF-8 - The request body must be
grant_type=client_credentials
Our request should be then as follows:
POST /oauth2/token HTTP/1.1
Host: api.twitter.com
User-Agent: My Twitter App v1.0.23
Authorization: Basic eHZ6MWV2RlM0d0VFUFRHRUZQSEJvZzpMOHFxOVBaeVJn
                     NmllS0dFS2hab2xHQzB2SldMdzhpRUo4OERSZHlPZw==
Content-Type: application/x-www-form-urlencoded;charset=UTF-8
Content-Length: 29
Accept-Encoding: gzip


grant_type=client_credentials
We check in Postman that we get the Bearer:
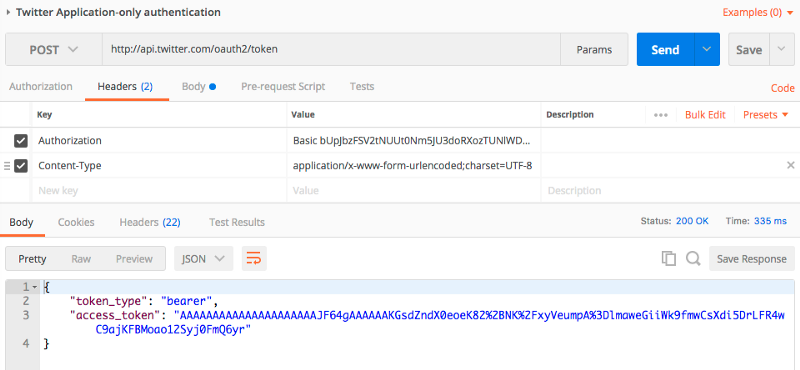
Response with Bearer token
Step 3: Authenticate an API request with the Bearer token
The obtained Bearer token can be used to query API endpoints which support
Application-only authentication. To use this token, when we build the HTTP
request we must include a header Authorization with the value Bearer <step
2 value> .
Example request:
GET /1.1/statuses/user_timeline.json?count=100&screen_name=twitterapi HTTP/1.1
Host: api.twitter.com
User-Agent: My Twitter App v1.0.23
Authorization: Bearer AAAAAAAAAAAAAAAAAAAAAAAAAAAAAAAAAAAAAA%2FAAAAAAAAAAAA
                      AAAAAAAA%3DAAAAAAAAAAAAAAAAAAAAAAAAAAAAAAAAAAAAAAAAAA
Accept-Encoding: gzip
These steps were extracted from Twitter official docs.
Twitter Search API in Node.js
Now that we have the Bearer token to make requests with our app, we can start to see what the Twitter API offer to us. We just want to have a list of the most recent tweets from a search or hashtags.
Because of that we are going to use the package twitter for Node.js. The
official documetnation can be found
here.
In the following steps I’m going to assume that you have Node.js properly configured. If you don’t have it, you can take a look here.
To do a simple script that show us tweets based on certain hashtags we’ll follow these steps:
1- Open the terminal app and do npm install twitter. This will create the
folder node_modules with the Twitter library.
2- We enter npm install dotenv so we can use a configuration file for the
environment variables
3- We create a file .env and add the following content:
TWITTER_CONSUMER_KEY=<ConsumerKey>
TWITTER_CONSUMER_SECRET=<ConsumerSecret>
TWITTER_BEARER_TOKEN=<BearerToken>
Where we replace <ConsumerKey>, <ConsumerSecret> and <BearerToken> with
the values for our app in Twitter.
4. We create a JavaScript file called relevant_tweets.js with the following
content:
In this script we do the following:
- Instance a Twitter client and indicate the saved variables in
.env - Make a
GETrequest tosearch/tweetswith parametersq:"#ios #swift" - Show the result on console
5. We run node relevant_tweets.js on the console and see that it show us:
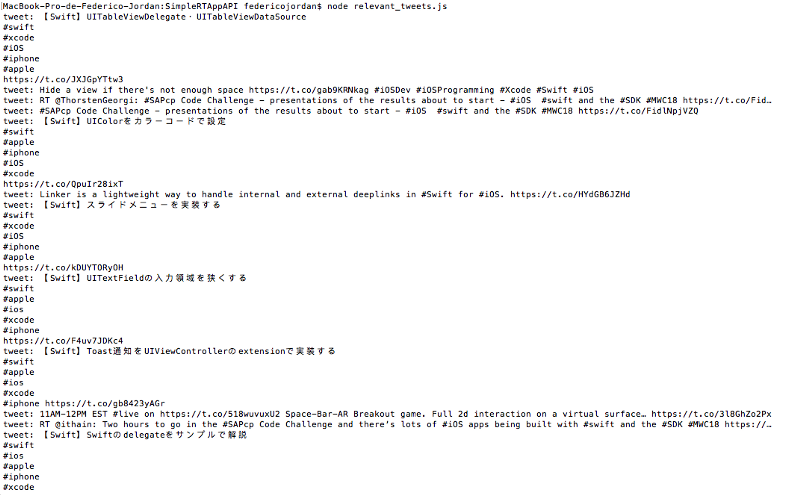
Tweets with hashtags #ios #swift
It show us the most recent tweets that contains the hashtags #ios and
#swift.
You can find the finished project in
https://github.com/fedejordan/SimpleRTAppAPI,
tag relevant_tweets.
Conclusions
We learned how the Twitter app-authentication works. We generated the required credentials to be able to use it, and also a practical example in Node.js about how to use the Twitter Search API, to obtain tweets with certain hashtags.
In the following posts I’m going to convert this script in a cron job that can see the relevant hashtags for the users, and can be sent as push notifications to their devices.
Any doubt, or suggestion you can do it commenting this post or sending an email to fedejordan99@gmail.com. Also you can follow me or send a direct message to my twitter.
Thank you very much for reading!
This article is also available on Medium