SimpleRTApp: Authentication and retweet with Twitter API in iOS
This is the first part of a series of articles with the idea of building a system that automates the retweet of any content that we consider interesting. To see the complete list of topics, click here.
In this article, I’m going to explain how to use the Twitter API to obtain an authentication, in order to make a retweet with the corresponding tweet id. So we are going to:
- Create an app in Twitter and integrate the SDK
- Authenticate the user through TwitterKit
- Show a tweet from its id
- Retweet that tweet in the logged user account
Create an app in Twitter
Twitter provides us enough documentation about its API. This can be found in https://developer.twitter.com/en/docs/basics/getting-started
To use the Search API service, they ask us to create an app in their site. It’s mandatory to have a Twitter account to do that. So we create an app in the web:
- First we go https://apps.twitter.com/ and tap Create new app.
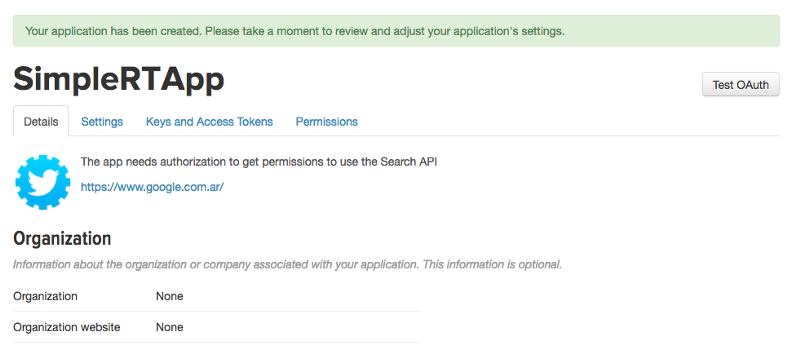
- The page ask us some data to identify our app. In my case I put:
App name: _SimpleRTApp_


Description: _The app needs authorization to get permissions to use the Search API_


Website: [_https://www.google.com.ar/_](https://www.google.com.ar/) __ (for now we don't have website)
3. We accept the terms and conditions and tap Create your Twitter application. In this step it might be they ask for our phone number to validate our twitter account. More info here.
4. We finish with the app creation and should have a screen like that:
SimpleRTApp creada en Twitter apps
We go to the permissions tab and we ensure that we have enabled Read and write permissions.
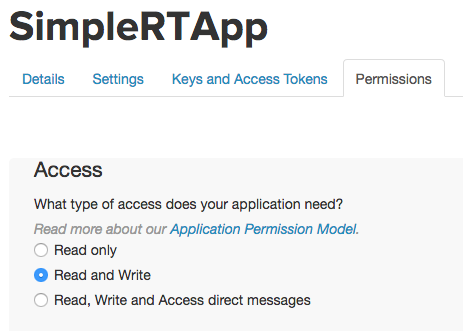
Read and write permissions
This will allow us later to do retweet with the user consent. More info about permissions here,
Installing iOS SDK: twitter-kit-ios
Once we configured the app in Twitter, we proceed to install the iOS SDK. For that I’ve used CocoaPods:
- We do
pod initto create the Podfile in our project - We configure
pod 'TwitterKit'in our Podfile and we runpod installin terminal - We open the generated workspace and go to
Info.plistto configure the Twitter app keys. We add the following:
// Info.plist
<key>CFBundleURLTypes</key>
<array>
  <dict>
    <key>CFBundleURLSchemes</key>
    <array>
      <string>twitterkit-<consumerKey></string>
    </array>
  </dict>
</array>
<key>LSApplicationQueriesSchemes</key>
<array>
    <string>twitter</string>
    <string>twitterauth</string>
</array>
Where <consumerKey> is the Consumer Key of our app. We can find that in
the Twitter dashbourd in Keys and Access Tokens tab.
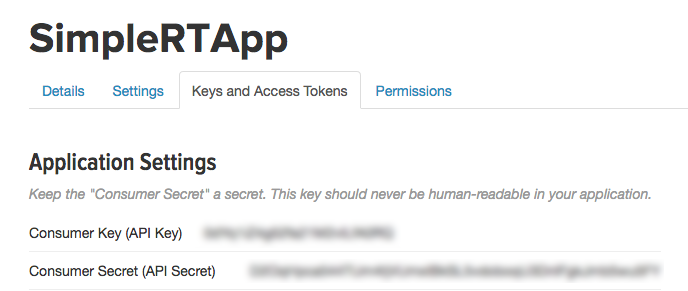
Consumer Key and Consumer Secret to configure our iOS app
4. Let’s go to AppDelegate, we add import TwitterKit and the following
line in didFinishLaunchingWithOptions method:
TWTRTwitter.sharedInstance().start(withConsumerKey: "<consumerKey>", consumerSecret: "<consumerSecret>")
Where we replace <consumerKey> and <consumerSecret> by the Consumer
Key and Consumer Secret from previous section.
Done! We have our app properly configured and we can start consuming the Twitter API.
For more info related to the API you can see the official guide from Twitter here.
Authentication with Twitter
To be able to use the login with Twitter in our app we have to do the following:
- We go to
AppDelegateand implement the following method:
func application(_ app: UIApplication, open url: URL, options: [UIApplicationOpenURLOptionsKey : Any] = [:]) -> Bool {
   return TWTRTwitter.sharedInstance().application(app, open: url, options: options)
}
This will allow us to manage the log in our app, in order to save the authentication token.
2. Add SafariServices.framework to be able to SFSafariViewController, in
case the Twitter app is not installed on the device and we have to use Safari
to achieve the login.
3. The easiest way to do the Twitter login is to add a TWTRLogInButton so
the user will have his Twitter session in our app and we will also obtain all
the required data to tweet with his account later.
For this, in our ViewController we add the import TwitterKit and in the
viewDidLoad() method we insert the following code:
let logInButton = TWTRLogInButton(logInCompletion: { session, error in
    if let session = session {
                print("signed in as \(session.userName)");
            } else {
                let errorDescription = error?.localizedDescription ?? "unknown"
                print("error: \(errorDescription)");
            }
})
logInButton.center = self.view.center
self.view.addSubview(logInButton)
We compile the app and we should see something like this:
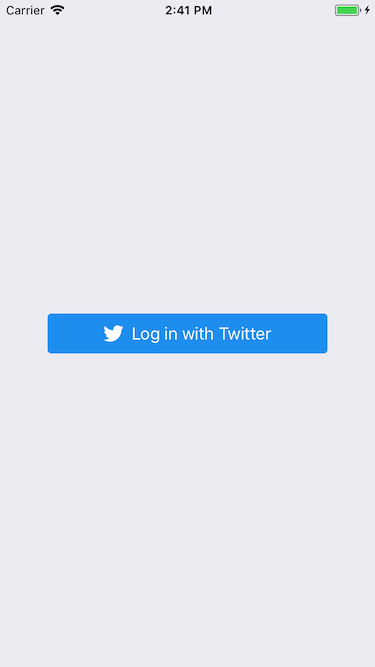
We added the “ Log in with Twitter” button
It will ask us to open the Twitter App, we tap Connect and our app will have the user ‘s session data.
We debug a little and see the data that login give us:
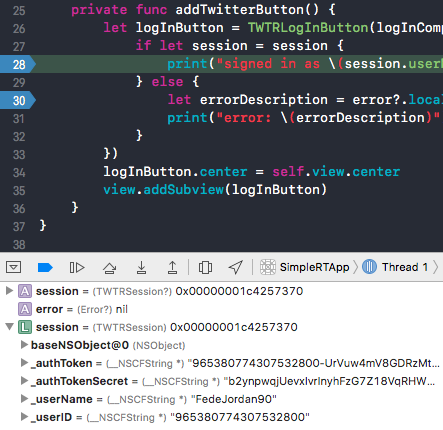
Twitter session data in our app
This confirm us that we are already logged with Twitter in our app.
You can see the final code in
https://github.com/fedejordan/SimpleRTApp,
tag login_with_twitter. It’s important to say that you’ll have to use your
own ConsumerKey and ConsumerSecret when you compile.
Retweet with tweetId
Another feature that we wanted to do is, given a tweetId, retweet it automatically. This will allow us to later receive the pushes with the tweetId and retweet it automatically in our app.
For this we go to the Twitter documentation and see if there is any functionality that allows us to do this. But first let’s try the tweet API a bit.
We create a RetweetViewController and add the following code:
We design a simple screen (which we presented when the login was successful) of this style:
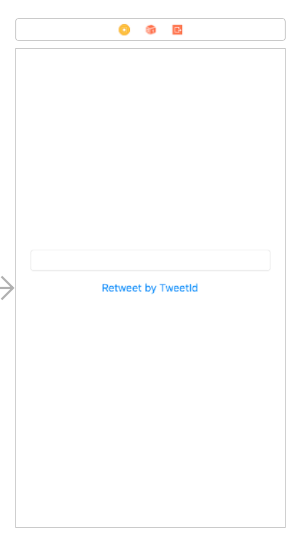
RetweetViewController in Storyboard
We test writting in the text field the number 20 and we see that it gives us as a result:
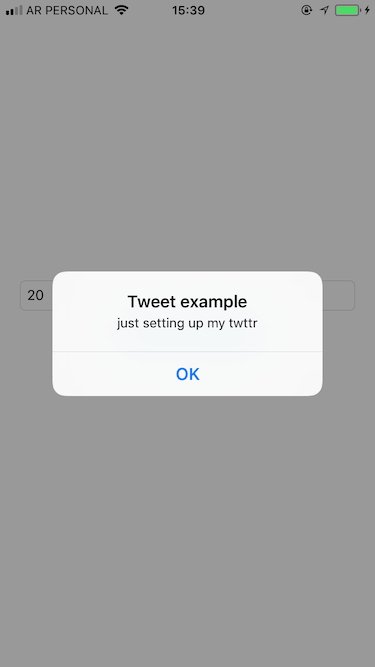
tweetId 20 text
More information on how to load a simple tweet on this
page. The code is in the same repo as before in the tweet_query tag.
Now that we have seen how the Twitter API works, we see how it is the documentation to make a retweet. Here is the specification.
For this we have to build a Tweet Request manually. We changed the following
RetweetViewController code to use the API:
Something to note is that we changed the initialization of TWRTAPIClient()
by TWRTAPIClient.withCurrentUser(), since we need the client to know the
user’s credentials.
We compile the app, we put the tweet id 20 and we see that we retweet successfully:
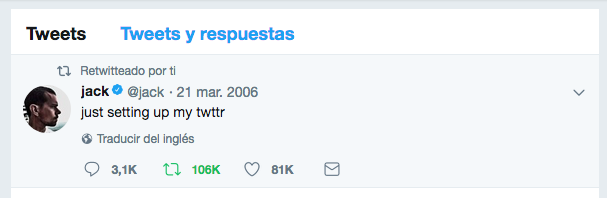
Retweet done :)
If we see that for some reason it gives us the following error:
Error: Error Domain=TwitterAPIErrorDomain Code=220 "Request failed: forbidden (403)" UserInfo={NSLocalizedFailureReason=Twitter API error : Your credentials do not allow access to this resource. (code 220), TWTRNetworkingStatusCode=403, NSErrorFailingURLKey=https://api.twitter.com/1.1/statuses/retweet/20.json, NSLocalizedDescription=Request failed: forbidden (403)}
It is because we didn’t correctly configure the permissions of our app (you need to explicitly warn the user that the app is going to make use of the retweet functionality). In that case, we would have to go to the app configuration on Twitter and check that it has Read and Write permissions.
It may also be that we have not used TWRTAPIClient.withCurrentUser() to do
the retweet, since the request has to be authenticated.
The final code can be seen as always in the project
repository, tag retweet.
Summary
We learned how to create an app on Twitter. The mandatory steps to configure it, which permissions we need and which keys are important. Then we saw how to install the SDK, authenticate the user, load a tweet using its id and finally make a retweet of that same tweet with the TwitterKit SDK.
If you have any questions or suggestions you are welcome to write a comment on the post or send an email to fedejordan99@gmail.com. You can also send a message to my twitter.
Thanks for reading the article!
This article is also available on Medium