How to obtain relevant tweets in a iOS app with Heroku + NodeJS + Swift
It always happened to me that I want to save time. And nothing better than doing it by automating it in some way.
Since I started writing posts, I always thought the task of maintaining a twitter account. I’m not really a fan of social networks (but I recognize that memes often take me a lot of time). That’s why, when I opened my Twitter account, I wanted a way to post relevant content without having to search in the app all day.
Although the Twitter app provides you with notifications, I just wanted the feature to notify by relevant hashtags, and the app only provides content strictly related to your account. I simply wanted to reach the target of automating the process in some way.
That’s why I decided to create a system that basically tells me of the content of my interest, and let me retweet it as easily and quickly as possible.
Note: For sure in the market there are solutions that allow you to do this. I’m also sure that my implementation is not completely efficient. The idea is to learn and achieve the stated goal at first in the process.
My idea is basically do my own solution, and learn to use Heroku and Node.js in the process :)
Used architecture
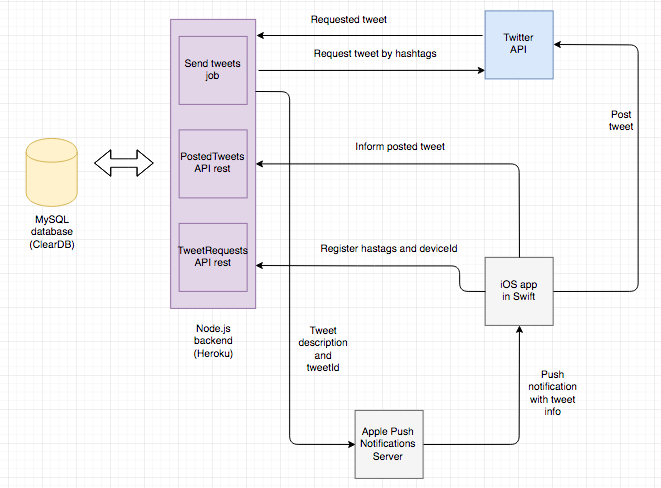
Architecture for SimpleRTApp (draw.io)
I called the system SimpleRTApp , and basically it consists in a Node.js backend and a iOS app made in Swift. As you will see in the nexts posts, everything is going to be open code.
The concept is not very complicated. I’m going to explain it in a few steps:
- The user tells the app in which hashtags is he interested. Lets say for example that I want to see tweets that contains hashtags like #ios #swift #programming, nothing else.
- The app does a request to a backend API that register the deviceId and the related hashtags. The server is going to be hosted in Heroku. All the data is going to be saved in a MySQL database.
- There is a cron job running in backend that checks if we have to send any notification. If we need to send, the job query the Twitter API for these hashtags. It selects the most relevant one.
- The description and the tweet link (or tweetId) is sent to APNS (Apple Push Notifications Server) with the properly deviceId.
- APN sends the push notification to user device.
- The user, without openning the app, can choose to retweet or ignore the tweet.
Involved concepts
To do all this logic we need to understand the following concepts (also time, of course :P)
- Twitter API for iOS (We need to authenticate users, to obtain tweets in backend and do retweet in app)
- Twitter Search API for Node.js
- Node.js basic usage to do API REST
- Node.js + MySQL setup
- API Rest usage on iOS with Alamofire + Codable
- APN usage to send pushes from Node.js
- UserNotifications SDK for iOS, with the usage of custom actions from push notification
- Deploy our backend in Heroku
- Cron jobs usage on Heroku
That’s why I divided the explanation into 8 parts, so that it is easier to understand.
I think that these posts cover the minimum content to develop a project from start to end, and could be a good base to developers that just know iOS frontend. Everyone of us in some moment should know something about how a API Rest works inside.
Don’t forget to comment any suggestion that you have about the usage of these concepts.
Thank you very much!
If you want to contact you can follow me on Twitter or send me an email to fedejordan99@gmail.com
This article is also available on Medium