How to do UI testing in iOS with FBSnapshotTestCase
How many times has it happened that you change some code in a View Controller and when you test the app in production the view has magically changed? Shouldn’t we have some way to ensure that the view doesn’t change if we don’t want to?
For this reason it ‘s important to do UI testing. By adding UI tests, we can ensure that no unintended changes are made to the UI.
In this article we are going to focus on the usage of FBSnapshotTestCase, in a simple sample project.
FBSnapshotTestCase’s history
Initially FBSnapshotTestCase was created and maintained by
Facebook. It is a
very useful tool which has a very simple implementation. All that is required
is to integrate the library to the project and instantiate the UIView or
UIViewController subclass that we want to test.
Unfortunately, as of last year Facebook has stopped maintaining this tool. Facebook has created another tool more tightly coupled to their internal infrastructure and because of that they deprecated the support for this tool.
Fortunately for us, Uber decided to create a fork of the project which they currently maintain.
Differences with Fastlane Snapshot
FBSnapshotTestCase tests are actually unit tests that allow us to compare a
reference image of a UIViewController (it can be a UIView as well, but
generally it is done in full screen) with the current rendering of the view.
If there are any inconsistences (differences between first and second image)
FBSnapshotTestCase will generate a third image with the differences pronunced
in gray scale. The tool generates this third image, if there are differences
between reference image and current from the project, and an error is
generated in that unit test causing the test suite to produce a failure.
Fastlane provide us with a similar tool, Fastlane Snapshot (repository) which allows us to take screenshots in the Xcode UI tests. When all the UI tests finish, if they were approved, it generates an HTML file with all the screenshots. Fastlane Snapshot also allows us, by default, to set all the devices and languages that we want to see. This can be very useful to test all the posible combinations (if you have 3 languages, 10 screens in the app, and you support 5 devices, it generates 3 x 10 x 5 = 150 screenshots!). The problem is that it is only a screenshot, it doesn’t bring us information about if the image has the correct UI.
In summary, FBSnapshotTestCase allow us to compare and tell us if we have any errors, Fastlane Snapshot just bring us screenshots of our Xcode UI tests.
List of topics
We are going to talk about the followings topics, trying to utilize the tool to its full potential:
- How to integrate FBSnapshotTestCase
- Refactor code with SnapKit and usage of FBSnapshotTestCase
- Write a script to generate screens with different resolutions
How to integrate FBSnapshotTestCase
To start the tutorial, download the following example project https://github.com/fedejordan/FBSnapshotTestCaseExample
Compile the project in the simulator (I used iPhone 8) and you are going to see the following screen:
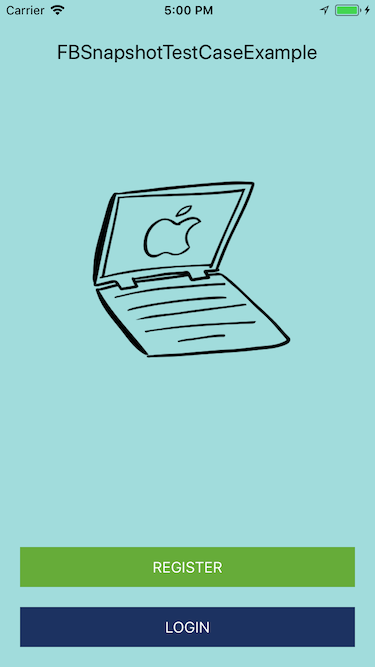
Example code screen
A simple View Controller that could be the first screen of any app, with login and register buttons.
I’ve used CocoaPods to integrate the SDK. You may use Carthage or your package manager of choice. The steps to integrate the tool are in the repository’s guide. For convenience, here are the installation instructions using CocoaPods:
- In the terminal app we enter
pod initto create the podfile - In the podfile we add
pod 'FBSnapshotTestCase' - We do
pod installin terminal to download the SDK
The version that I’m using here is 2.1.6
Once we integrate the SDK into the project, we open the workspace generated by CocoaPods and compile the project to see that everything works fine.
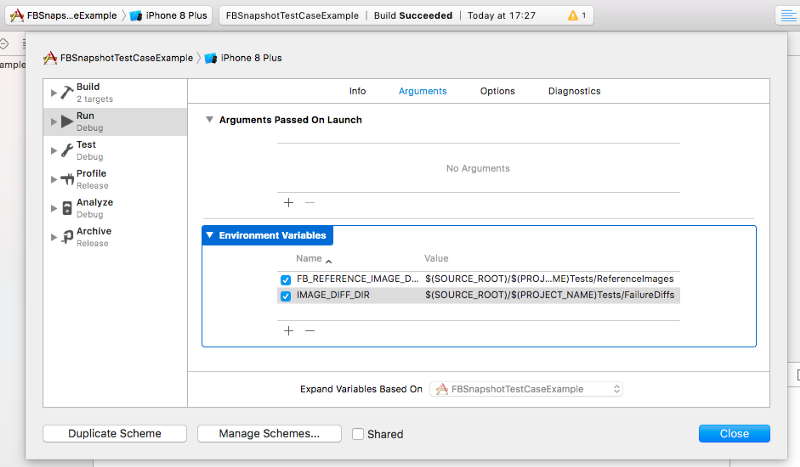
As it says in the FBSnapshotTestCase official guide we go to Edit Scheme -> Run configuration, to
correctly set the folders for the reference and failed tests images (the ones
with differences from the referenced ones). We set the corresponding
environment variables.
Now we can create our first unit test with FBSnapshotTestCase. To do that, we have to do the following:
- We create a new unit test and subclass
FBSnapshotTestCaseinstead ofXCTestCase. - Inside the test, we use
FBSnapshotTestCaseto tell which view we want screenshot. Later, we instantiate the classViewControllerusing theUIStoryboardclass. - Run the test with
self.recordMode = YESinsetUpmethod, inside the test class. This creates the reference images in disk. We have to do it anytime we want to do a intentional change in a screen. - Delete the line that enables the record mode and run the test again.
Our code should look very similar to this:
If we go to Finder to look into the folder Tests/ReferenceImages we will see
the saved image of our View Controller for an iPhone 8:
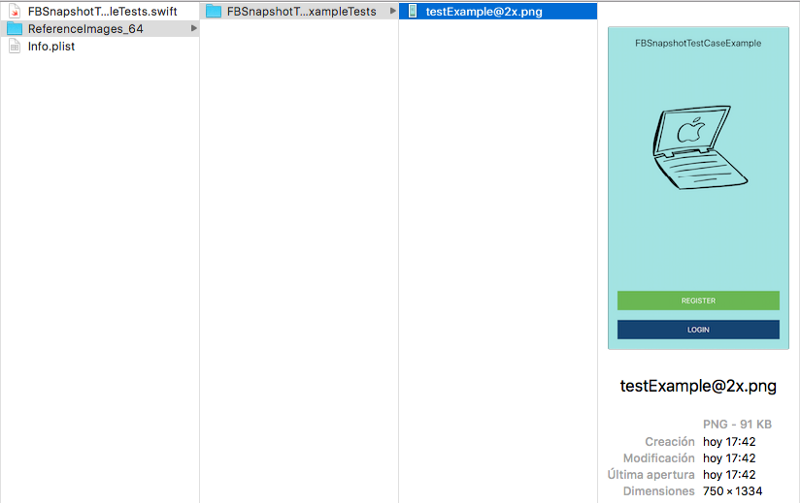
FBSnapshotTestCase image saved in disk
This image will be used to compare with the future images that our project generates, whenever we add or modify things in our UI.
If you want to see the result of the test, you can do a check out to the
branch first_snapshot_test in the same repo I told before.
View code refactor
Let’s see a practical usage that this tool can bring us.
Let’s say that I started to work in a team and I decided that storyboards are not an scalable thing, so I decided to migrate all the UI stuff to code. I investigated a bit, and I liked a library called SnapKit.
I’m not going to talk about the details of how to use this library. So I’m going to show directly the code that results of doing the same screen with a storyboard, now with SnapKit.
To do that, it was neccesary to delete the storyboard file and instantiate the
View Controller from the AppDelegate. In the test we use let viewController
= ViewController() to instantiate the class ViewController.
Now we are going to test if we did a good refactor with FBSnapshotTestCase. To do that we have to press Cmd+U.
So we found an error:

Error testing the refactor with SnapKit
Open the FailureDiffs folder and see what happened:
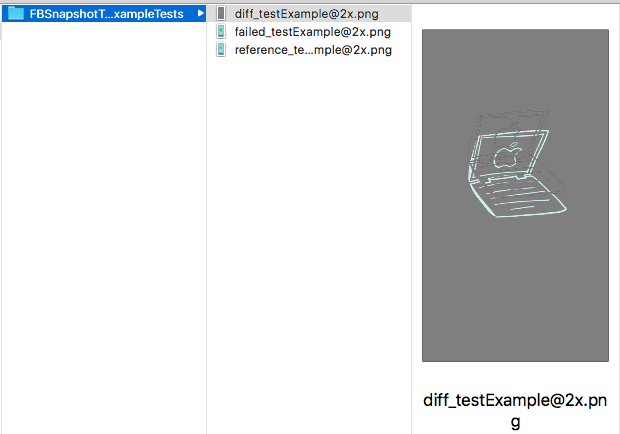
Actual image difference with reference one
Seems that we set the wrong value for the image view constraints. As we can see, it is the only object that seems different in UI.
We look at the code and change:
make.top.equalTo(titleLabel.snp.bottom).offset(100)
With the following:
make.top.equalTo(titleLabel.snp.bottom).offset(60)
Test again with Cmd+U, and the unit tests should be OK.

Refactor approved :)
You can download the final refactor with SnapKit doing a checkout in
snapkit_refactor branch, in the example git repository.
Screens generation with different resolutions
In the last example, we saw how to use the tool for an iPhone 8. But, what happens if we want to test in all the devices that we support?
We would have to configure the tests to do it in the different simulators any time we want to do it. Something not very practical.
Because of that I did a script that can do the tests in any device we want. Something similar to the Fastlane Snapshot configuration, but without languages support.
To use the script it’s neccesary that in the setUp() method in test class we
put self.isDeviceAgnostic = true so the device identifier (the device
resolution in this case) is added to the file name.
The script is public and you can see it below. You just have to change the
workspace and scheme values:
It generates an output of all the screenshots of all the devices that are specified. To see if there was an error in any screenshot, we have to see the output that it generates.
In that example, I’ve only included the iPhone devices, but it allows any other device that our project supports.
Later I will try to do the same script but adding languages support, generating a web page that shows all the results. More similar as how Fastlane Snapshot works.
Summary
We learned how to use a simple but powerful tool, that allows us to check if we accidentaly added any unwanted change in our UI.
We saw an example of how to refactor a view from a storyboard to use SnapKit, and how FBSnapshotTestcase allows us to check we did the things properly.
Also I shared a script that allows to create screenshots in any specified device. I think that it’s useful when we have different designs that require special care in all resolutions.
If you liked the article or you see any error that you could fix don’t hesitate to comment or send me an email to fedejordan99@gmail.com
Thank you very much! :D
This article is also available on Medium