Creating a Fastlane action to publish code coverage on Github
Introduction
When we start working in a team, we realize that there is a need for some tooling to help the project sanity.
One of the things that we want to improve is the general testability and scale the project to be able to add more features and not suffer a lot in the process. And if we start talking about testability, there it comes the concept of code coverage.
Measuring code coverage means that we want to get an estimation about how much unit testing we are doing in our project. This is not an ultimate answer to all our quality problems (we can have a project with a good coverage but the business rules are not working at all) but it’s a good parameter to keep in mind if we are doing our tests.
In this article we’re going to use Fastlane and Slather to get a code coverage report and post the number to a related pull request, as a status
What is Fastlane?
Fastlane is a open source ruby tool created by Felix Krause which contains a set of plugins and actions with the purpose of helping mobile developers with automating the maintenance of a project, uploading a release to the app stores, sharing a beta build with testers, and much more.
It started being a tool just for iOS native development but it was scaled to be used in Android, React Native and many other platforms/languages.
As I said, it contains a predefined set of actions to use but we can create our custom action, and use the other plugins that the tool contains.
What is Slather?
Slather is a ruby gem which generates a code coverage report for Xcode made projects. Basically it’s called from the command line and it creates a pretty HTML report with the coverage for every swift/objc and the general coverage for the whole project.
Fastlane contains a Slather action which is simply a wrapper for the original command line gem, which is very useful to add to our Fastlane made CI script.
About Github API
We’re going to use Github as git repository provider, and it comes with a very complete Github API to interact with many things about the metadata related to our project there. The idea is to use the Statuses API so we can make a API call for a desired commit and update the current code coverage for that commit. It will appear in the git history with a green check and also in a PR as a status check at the end of the page.
Status checks can have four statuses: error, pending, failed and passed
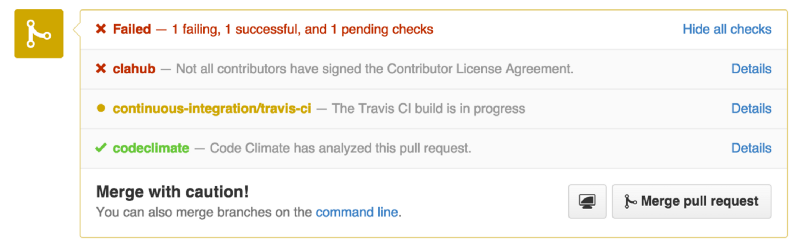 |
|---|
| An example for Github Status checks in a pull requests. |
Fastlane also contains an action to use the Github API, which also simplifies our process to integrate all the steps to publish the code coverage
Desired flow
Having all these tools in place, we can imagine a flow with all the steps as something like this:
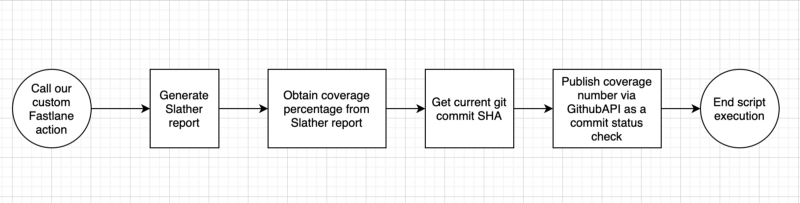 1. First of all, we’ll call our custom Fastlane action. This can be done manually for now but if we have a CI like Bitrise, Circle CI, Jenkins it’ll be more useful to have it in our PR check job
- Generate Slather report. This’ll get the Xcode project/workspace as a input and will create a HTML report with all the numbers for our project
- Obtain coverage number from Slather report. We’ll need to read the HTML file and get the coverage number for our project
- Get current commit SHA. This can be done with a simple git log -1 or a fastlane action called last_git_commit. Again, if we’re using a CI it’ll be better to use the environment variable that contains the triggering commit. Bitrise has a BITRISE_GIT_COMMIT environment variable for instance.
- Last, we use’ll the github_api Fastlane action to publish the status check for the related commit with the coverage number as description.
Implementation
I’ve created a simple iOS project with no UI but a class with “some testing on it”, you can clone it from https://github.com/fedejordan/code-coverage-status-check
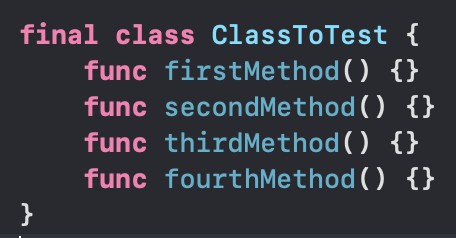 |
|---|
| A very simple class with some empty methods |
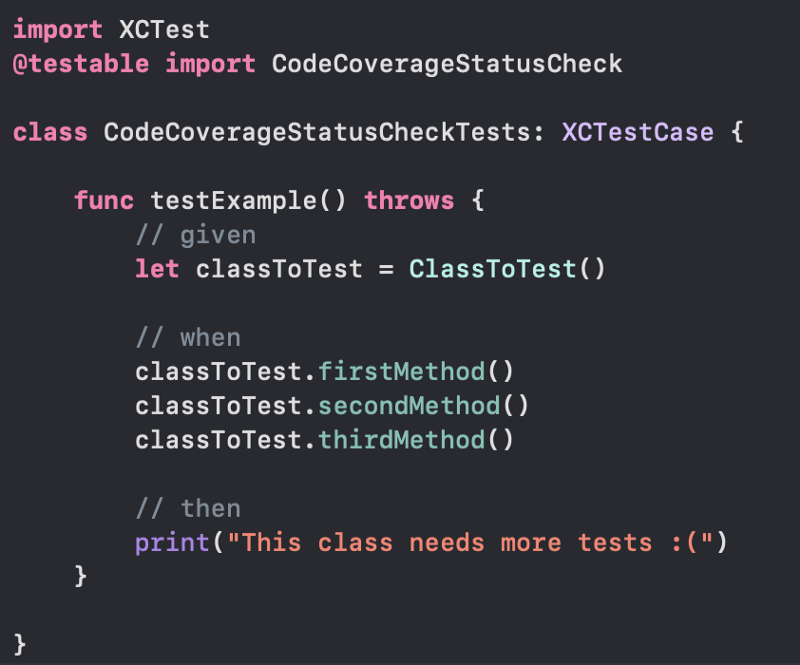 |
|---|
| “Testing” for that class |
I made it very simple because the idea of the post is not teaching about testing but knowing how to publish the number on a Github pull request :D
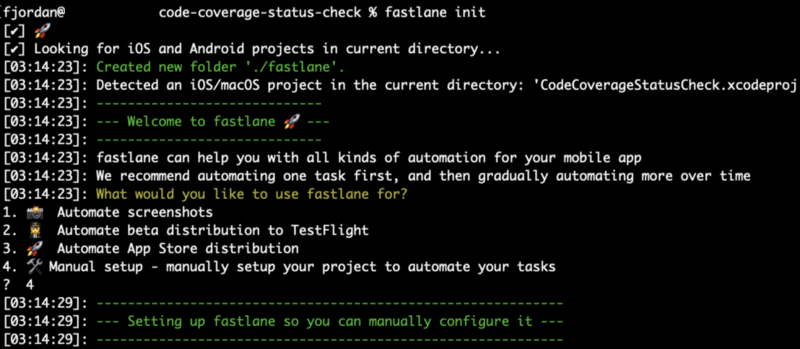
Installing fastlane
Next step will be installing Fastlane on our project. We can do it with the next steps from the Fastlane page.
When it asks for our installation mode, we can type 4 so we can have a empty Fastfile:
 |
|---|
| Choosing option 4 when installing Fastlane |
Our fancy Fastfile will be created inside fastlane folder and will look as something like this:
We are going to modify the content with the following:
Then we can type fastlane tasks_for_pull_request on Terminal and we’ll get something like the following:
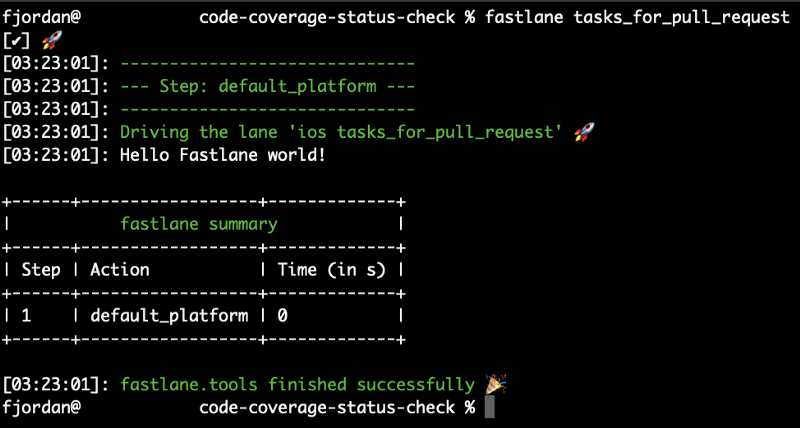 |
|---|
| Hello Fastlane world! |
Creating a custom Fastlane action
We can do all our code inside the tasks_for_pull_request lane but I consider a bit more straightforward to move all the logic to action. Otherwise we’ll end up with a lot of code in our Fastfile and won’t be so good after all.
To create a custom action we need to type fastlane new_action in command line:
 |
|---|
| Creating custom Fastlane action |
This’ll create a publish_code_coverage.rb file inside fastlane/actions folder with the following:
We’ll remove the extra boilerplate to end with something like this:
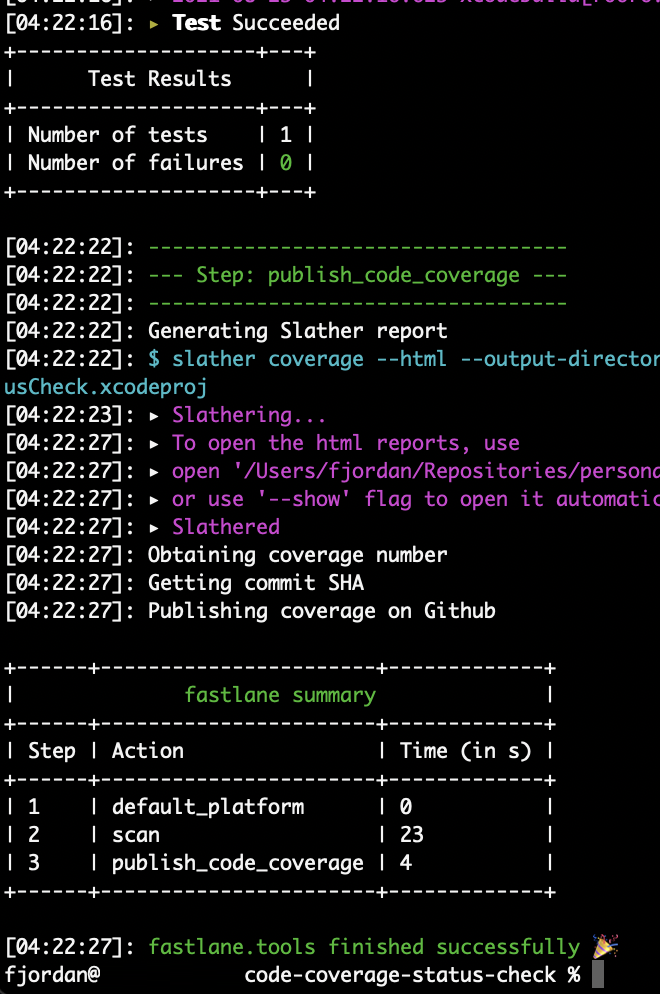
Our fancy new Fastlane action can be run from Terminal with the command fastlane run publish_code_coverage:
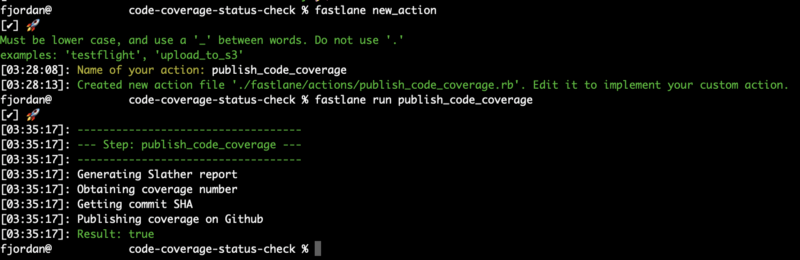 |
|---|
| Calling our new Fastlane action |
We added some messages telling the steps that we’re going to complete in the process.
If we want to call our action from the previous lane, we simply call it with the action name, like this:
And we call it like before:
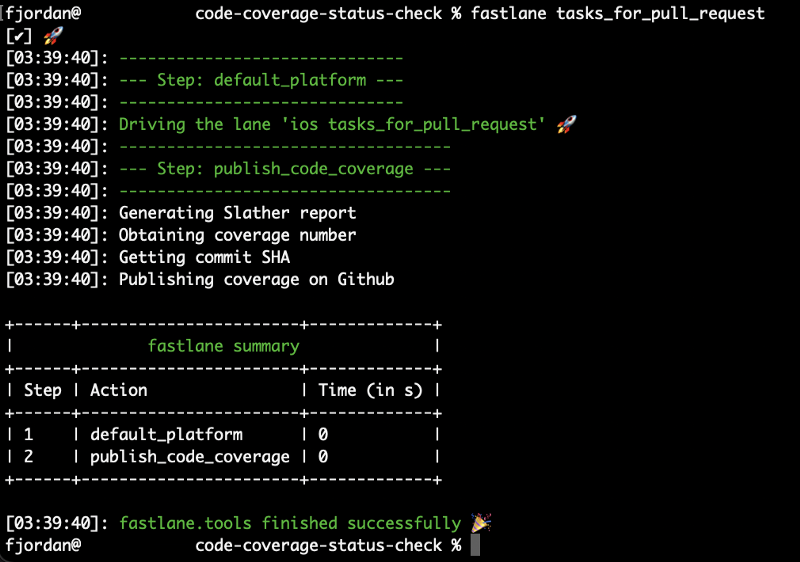 |
|---|
| Calling the tasks_for_pull_request lane |
Integrating Slather
First of all, we have to call Fastlane scan action to test the project and get the code coverage output from Xcode:
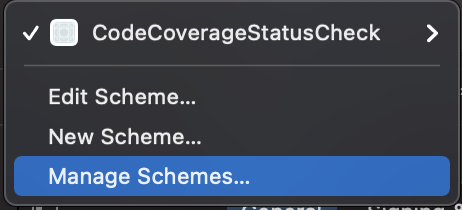
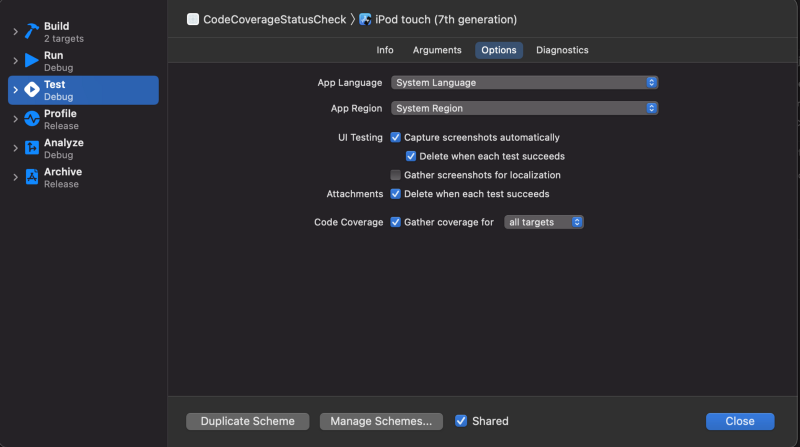
Another thing to be sure is that we are gathering the code coverage when testing our project scheme. This can be done in Manage Schemes… menu when selecting schemes:
 |
|---|
| Selecting Manage Schemes… |
 |
|---|
| Checking Gather coverage option |
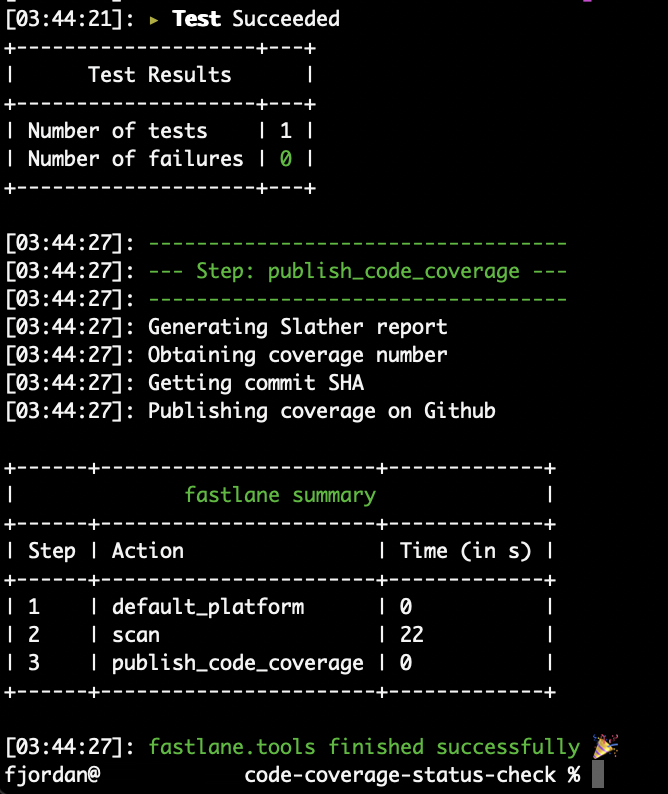
Now we can execute fastlane tasks_for_pull_request command from Terminal
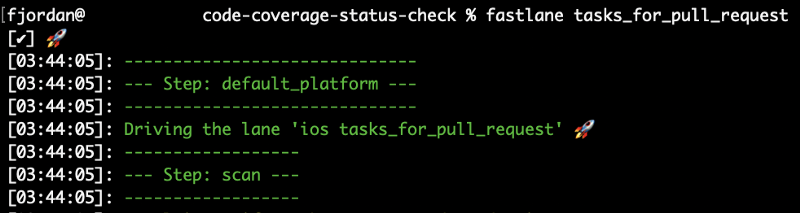
And it’ll end with calling our custom action:
To use Slather we have to add it to our Gemfile this way:
And then we execute bundle command to update our project gems:

… (more output) …

We can now integrate Slather in our publish_code_coverage adding it the following way:
We run our lane in terminal with fastlane tasks_for_pull_request:
And this will create a nice report in fastlane/code_coverage folder, index.html file:
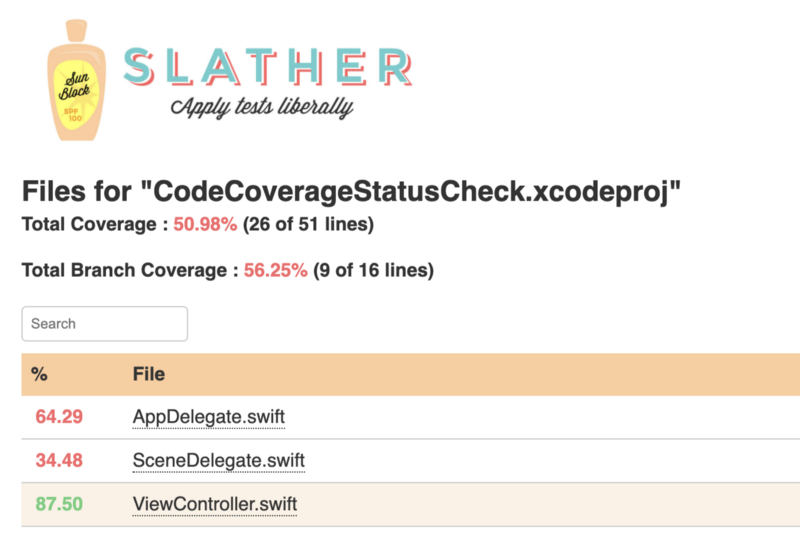 |
|---|
| Slather coverage report — index.html |
Obtaining code coverage number
We’ll use a ruby function to read the report file and get the percentage of coverage. In publish_code_coverage.rb file we add:
We added a get_code_coverage method to parse the index.html file, so we can get the exact string where the coverage number is.
If we run the script we’ll get the following output:
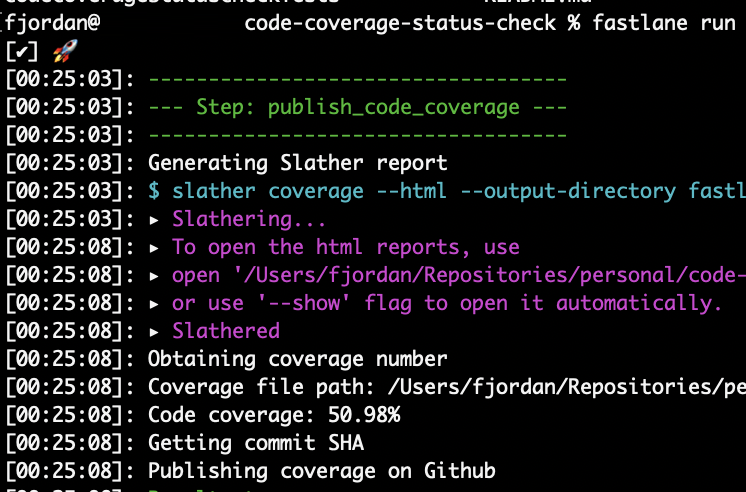 |
|---|
| We got almost a 51% of coverage on our project |
It can be seen that we’re printing the same coverage number that we got from Slather output.
Getting commit SHA
We need to get the commit SHA that we want to publish the code coverage.
To achieve this we’ll use last_git_commit action from Fastlane this way:
def self.get\_current\_commit\_sha
 commit\_info = LastGitCommitAction.run(nil)
 commit\_info[:commit\_hash]
end
And we’ll integrate in our custom action as following:
Our output:
 |
|---|
| Getting commit SHA |
Publish with Github API
The last step is to use Github Status API to post the message in our repository, so we can see it in a pull request
To achieve this, we’ll use the Github API action from fastlane:
We added a publish_to_github function which receives two parameters: message and commit_sha.
Then, we use GithubApiAction to interact with Github API. We set a few parameters, in this case I’m using an environment variable to get the Github API token, but if you want to test it you can add it as a raw string. If you are working in a CI environment, there are many options to get the value in a secure way, like this one from Bitrise CI.
Also, the path should belong to our testing repository. Remember to replace these values with yours.
Note: The Github API Token is just a Personal Access Token, which is an access to your repositories and metadata from them. Here is a well explained article about generating one
So, if we run our script we will get the following output:
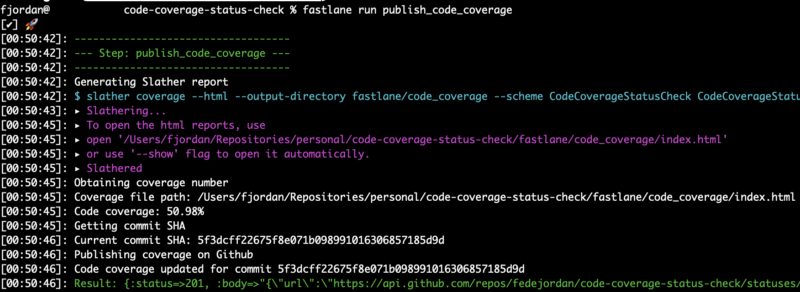 |
|---|
| Code coverage updated |
And if we create a PR with this particular commit, we’ll see a status check on it:
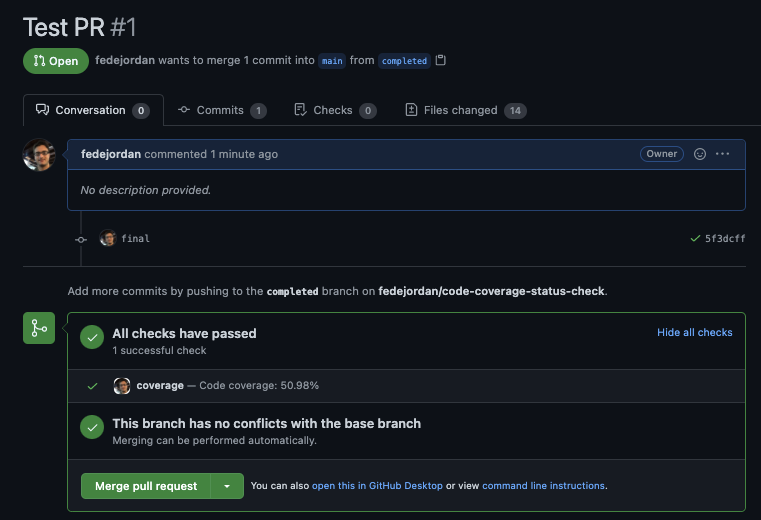 |
|---|
| Status check on Github PR |
We’re seeing my Github profile picture because the Github Token belongs to my account, but if we’re working in a team we can set a dedicated account with its token and the picture of this account will appear =)
Congratulations! You learn how to post your iOS project coverage number in pull requests :D
Conclusion
There are a lot of paths from here. You can play with the status value of the raw_value of the GithubApiAction call to set a threshold for the coverage. It’s as simple as adding an if and if the coverage is below a certain value, you’ll have to post a failed status. More info about possible status can be found on the Github Status API documentation.
Now you know how others integrations like Danger works under the hood. They are just nice wrappers so you don’t have to do all these things. As a recommendation, if you don’t have a dedicated automation team, I would prefer using some of these tools. If you think that can make the time to do it, maybe it’s better to create your own so your process is a bit more personalized.
I hope this article gives a little more of knowledge about improving your daily work in a team.
Thanks for reading!
This article is also available on Medium